[toc wrapping=”right”]Feature Box is one of a kind WordPress plugin which allows you to grab attention of your readers as soon as they land on your website. It is placed right below your header but above your main content.
Feature Box has only one, but extremely important mission – to turn your visitors into email subscribers.
I have just installed Feature Box here on Income Mesh (visible on homepage only – by my choice) and I love it! My conversion rate have already increased drastically!
Heres what you will learn in this review:
- How to install Feature Box
- Which email marketing services are supported
- How to choose the best Feature Box template for your blog
- How to customize selected template + make your subscribe buttons look great on mobile devices too
- How to place your Feature Box template perfectly on your blog
- How to split test your Feature Boxes to see which one is performing the best
- How to maximize your conversion rate with Feature Box
- Examples of other websites that use Feature Box too
- My experience with Feature Box
- Get 20% Feature Box DISCOUNT just for Income Mesh readers
How to install Feature Box
I thought of explaining and showing of how to install and setup Feature Box on your blog, but actually that is not necessary. Guys at Plugmatter (creators of Feature Box) have done a great job with their documentation and they explained everything perfectly.
See documentation here: http://plugmatter.com/user-guide.
Which email marketing services are supported
An image is worth a thousand words, so take a look below and I’m sure you will find your favorite email marketing autoresponder/provider within this group.

Choose the best Feature Box template for your blog
Optin Feature Box comes in 3 different packages: Single, Professional and Developer. Except the difference in number of licenses (1, 3, unlimited) and the price ($37, $57, $97), theres also a difference in the number of templates youll get.
In a Single package you get only 6 templates, in Pro and Developer you get 10. Actually, you get 15 templates, but the guys at Plugmatter didnt find time to update their website yet.
You can see the demo and try all of those 10 templates at their website. Everything is the same as if you are editing the templates in your WordPress dashboard.
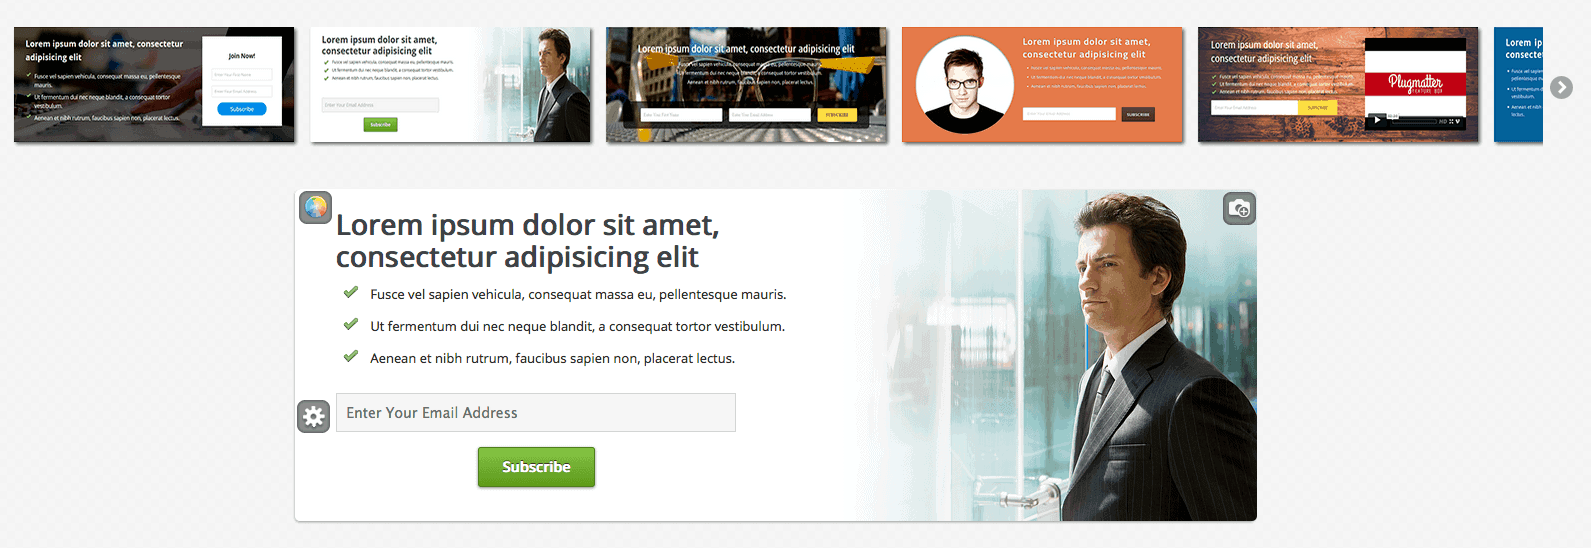
The other 5 new templates not shown on their website you can check below:


Those are actually mini versions of some of their main templates. They might come handy if you need a mini Feature Box on your blog or if the regular templates seem too big or too bulky for your website.
I just notice, you might not get the right impression of Feature Box just by looking at their website. Some of the templates, actually half of them, are full width. The rest of them are shorter, boxed versions, like the one I use on my blog.
Heres a short video showing all of the templates from inside of the Feature Box, within my WordPress dashboard:
Now that you know how every template looks like it is time to choose the right one for your website, here are some pointers:
- The menu at the top situation – If your main menu is at the top and logo is below it, Feature Box might look weird, thats why I have changed it on Income Mesh and have put the menu below and logo at the top. The reason I did that is because two images right below each other (logo and Feature Box) might be overwhelming for your readers and could decrease your conversion rate.
- Full width or fixed width? – Full width templates are amazing and can look great on your blog, as long as your header (logo and menu) is not too strong with colors. I say this because it could be hard to match the background color (or image) of the Feature Box with your header, but then again, you can always go with white background. Think of it like this, if a full width slider would look great on your blog, a full width Feature Box will too.
- Template types – When choosing a template first decide whether you want a template with just an email optin, or email + name optin. That will narrow your choice by half (not counting the mini versions). After that, decide if you want to have an image of you or your product on the feature box, or would you like to use a background image or have a video in it. This will narrow your options even more. From there it is a matter of personal choice and taste.
- Optimized for mobile devices? – Every template is responsive and optimized for mobile devices. However, there might be some fluctuations depending on how you use each template. For example, I use Sleek template which, in its standard format, has 3 lines of description text. But, after I added 2 more lines of text Ive noticed that those two last lines were overlapping with my product image. Ive contacted Feature Box support and they have fixed it within a day. Just keep that in mind. Check how your Feature Box looks on your mobile and other devices on Responsinator.
Honestly, I like maybe half of the designs in Feature Box templates, the rest of them are so-so. But a good thing is, thats only a matter of colors, fonts and images, everything else (positioning, format) is perfect.
Now lets see how to customize your favorite Feature Box template so it matches perfectly with your website.
[optinform]
How to customize selected Feature Box template
You have to realize that Feature Box is just a tool which helps you implement a nice optin box on your blog. Sure, it has templates that might look nice on your blog, but rarely any template (not just with this plugin, with others in general) will look perfect on your blog right out of the box. Most of them need at least some customization.
Luckily, Feature Box has made customizations amazingly simple, even for beginners. Everything is point and click, without writing any code (although you can, if you know CSS).
Heres what you can change on every template:
- on the Title (H1 tag) – you can change font (there are several hundreds of fonts to choose from, literally) and text color
- on Description text – style your text by making it all (or just parts of it) bold, italic or underlined; change the text color, font type and font size; put your description in a list
- on the Button – choose between 16 predefined button looks
- on the Background – depending which template you choose, change the background color and/or background image; upload picture of yourself or a product image
You can see and test all of these on their website where you will see a working demo. No registration, login, subscription or anything, the demo is fully exposed and available for everyone to try it out.
After you install it on your blog, play around with the colors, fonts and images until you find the perfect match with your website look. I suggest to keep it simple and clean, 2-3 different colors max.
[su_spoiler title=”For advanced users only – How to customize some parts of Feature Box with CSS – Click to expand” style=”fancy” icon=”arrow”]
*My advice, for any additional customizations you might want to do, contact Plugmatter support, they can do all of this for you!
Now this is a little bonus for you, a bit advanced, but it may help you in customization of your Feature Box. If you are not sure what you are doing, better contact Plugmatter for support and they will make necessary changes for you.
On my Feature Box here on Income Mesh blog, I used a bit of custom CSS styling. I wanted to change the button look, adjust the image size and add a border around my box. I assume most of you guys who would like to change something that is not available through Feature Box options will, in 99% of the times, want to change the same things.
If you are experienced with CSS you can skip this part. If not, keep reading, I will try to explain as simple as I can how to make those changes. Again, I recommend to contact Plugmatter directly for support if you are not sure what you are doing.
To see which part of the the code you need to change I suggest you to use Firebug, its a Chrome/Firefox add-on. After you install and activate it, right click on the element you would like to change and click on Inspect element with Firebug. A small window inside your current browser window will open (at the bottom) and you will see HTML on the left and CSS on the right.
Check this video for better understanding: https://www.youtube.com/watch?v=956IDvJ2Aa0
Find an element ID (starts with #) or class (starts with the dot .) and change colors, borders or other things through CSS.
To learn more about CSS check here: http://www.w3schools.com/css/
After you find it, insert it under Custom CSS below box, below your template (see image below).
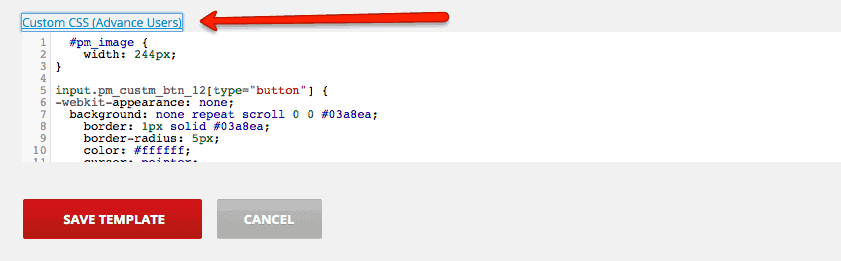
To help you out I will show you how this looks like with the things I have changed:
Changing the product image size in my template:
#pm_image {
width: 244px;
}
Customizing the button:
input.pm_custm_btn_12[type=”button”] {
-webkit-appearance: none;
background: none repeat scroll 0 0 #03a8ea;
border: 1px solid #03a8ea;
border-radius: 5px;
color: #ffffff;
cursor: pointer;
display: inline-block;
font-family: arial;
font-size: 17px;
font-weight: bold;
padding: 10px 25px;
text-decoration: none !important;
text-shadow: none !important;
}
Changing the border color on my template:
#pm_featurebox {
border:2px solid #eee;
}
To edit the same things as I did, find the things I marked red and change elements with CSS between the brackets. The one colored in purple makes your button look really nice on mobile devices.
At least now you know what you are looking for. But I repeat, ask Plugmatter for support if you dont know what you are doing.[/su_spoiler]
Place your Feature Box template perfectly on your blog
When I installed Featured Box the first time and saw it in action I thought man, I will have to use CSS to place it properly on my blog, what a hassle. Boy, was I wrong. Feature Box really gives you everything to make it as easy as possible to put your template in the right place.
There are 3 things you will use to place your Feature Box template perfectly on your blog, you can find it under your template editor (see picture below) and it looks like this:

- Width – Write the width of your blog in this box, that way your template will be the same size. If you are not sure how to find out the correct width you could use MeasureIt, a browser add-on for Firefox/Chrome, to make it easier for you.
- Top margin – Thats the space between the top of your Feature Box and your header. You can use a minus value if necessary to get the result you want (for example: -25). Play with it until you get the look you want.
- Bottom margin – Thats the space between the bottom of your Feature Box and your content area. You can use a minus value if necessary to get the result you want (for example: -25). Play with it until you get the look you want.
How to split test your Feature Boxes templates
Feature Box allows you to split test 2 different templates at once. First, create two different templates and save them. Then, go to Feature Box -> Split-Testing in your WordPress sidebar menu and youll get a window like this one below:
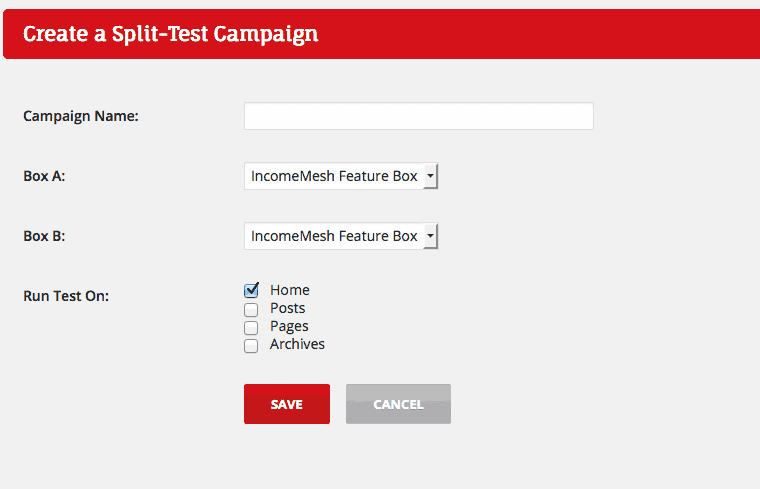
Now just add a name to this campaign, select Box A and Box B, and choose where do you want them to show up. Thats it. After that you will see statistics in that same menu and see which one performs better, ditch the loser, keep the winner and improve your conversions even more. Or, even better, keep testing by creating another campaign. 🙂
How to maximize your conversion rate with Feature Box
Here we have the usual talk that goes for any opt-in box on your website. In no particular order:
- Make your Feature Box fit nicely on your blog but, make it pop-out from the rest of your blog (for example, use different button color than the one used on your menu or logo)
- Perform A/B testing regularly – for example, I plan to split-test my feature box where one will have an image of my product (ebook) and the other one will have an image of ME. Sure, I am good looking (kidding), but will my face convert more visitors than my product image? It remains a mystery until I test it. You can do the same.
- Test some more – Change the text, change the colors, change the whole template. You will not know what performs the best until you try at least several different templates.
- Keep testing constantly.
I always say, what makes a difference between a good marketer and a great marketer? A great marketer keeps testing his actions constantly, keeps track of all things that matter and knows his stats.
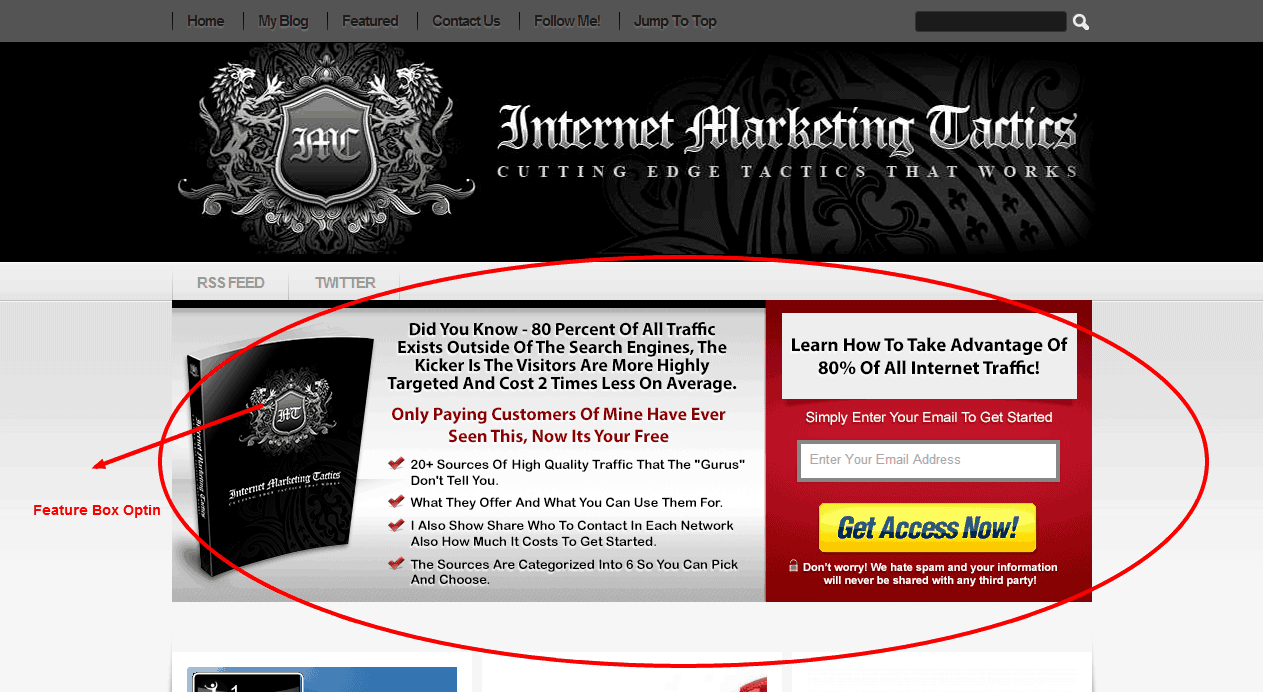
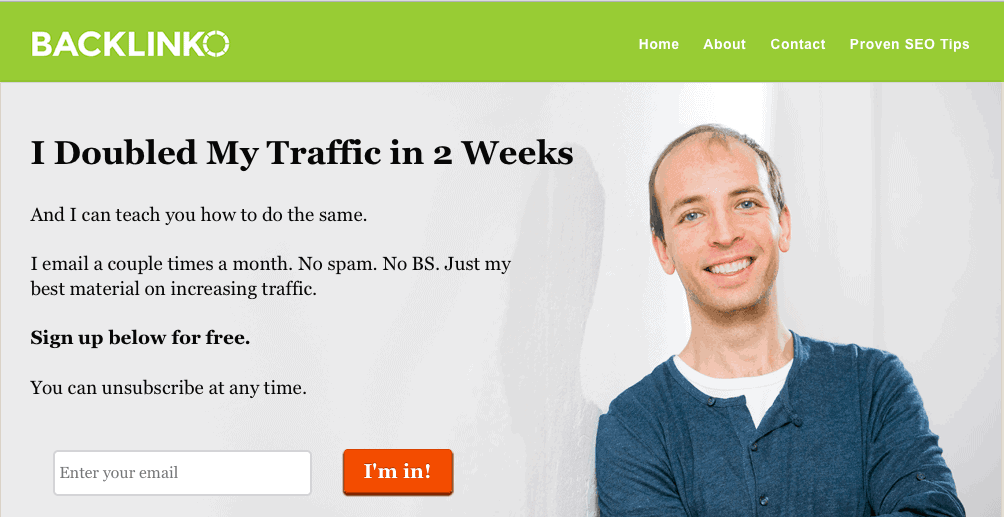
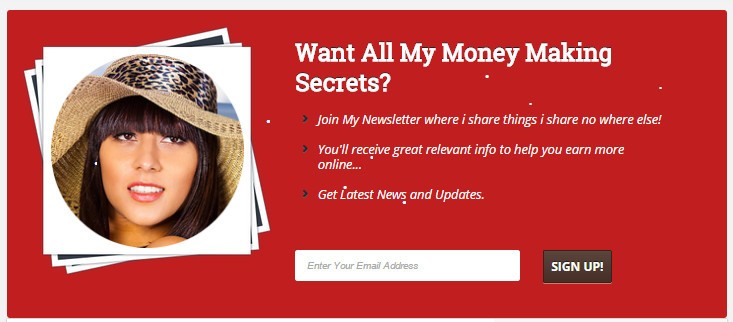
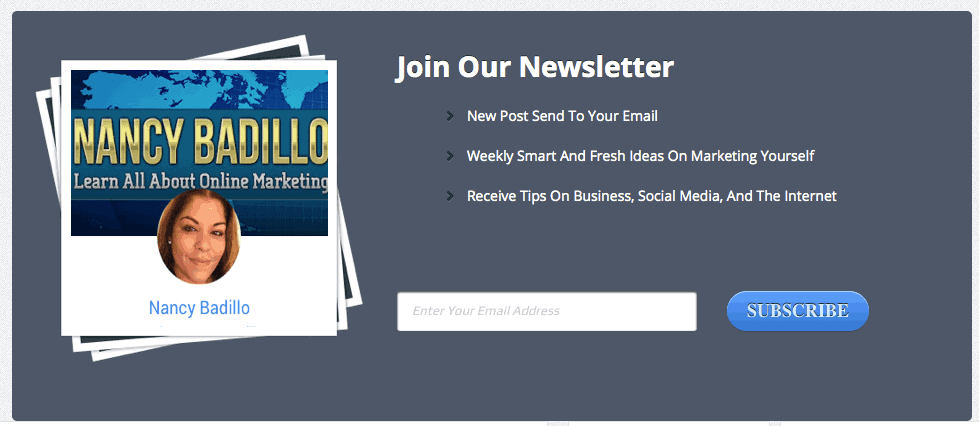
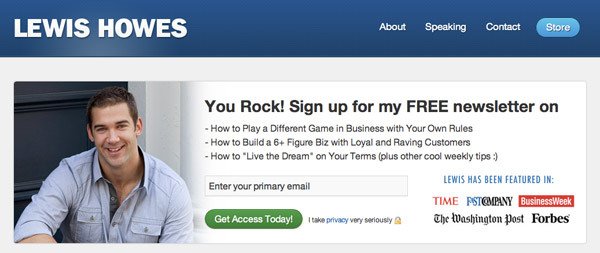
Examples of other websites that use Feature Box too
Many bloggers use Feature Box, check below images to see some examples.
*Note: Although majority of examples below use this Feature Box plugin, some of them have customized feature box on their website.


My experience with Feature Box
I have Feature Box installed for just a couple of days now (at the moment of writing this article) and I see a huge increase of sign ups already. I cant talk in exact numbers, but I would say at least 50% of increase for sure.
And I am not the only one. Check their sales page, others with feature boxes on their websites are experiencing the same increase.
I would say thats a good enough reason to get Feature Box for yourself, isnt it? No? Keep reading, maybe a 20% discount will convince you a bit more.
20% Feature Box DISCOUNT!
I saved the best for the end of this review 🙂
Since I really like Feature Box and I use it myself, I managed to get a 20% discount coupon for you guys if you buy Feature Box through the links from this article. I also suggest that you but the Developer version because it will only cost you $20 more than the Professional version, and it give you license to use on unlimited websites instead of just 3. Trust me, you will need it eventually.
Follow this link to buy Feature Box ? Click here
Use this discount coupon: INCOMEMESH20
And thats it guys, hope you liked this review. Please share your thoughts and comments below and go buy Feature Box to increase your subscribers list 😉


Hey man! Great article, really helped me out. But for some reason I can’t get the optin box to show up full width. Even if I custom change the width in the template settings, it doesn’t seem to work. Nothing changes. My optin box is always as wide as my menu bar, whatever I do. Any ideas why this could be happening? Thanks a lot!
Hey Alen, pls contact FeatureBox support and they will help you with any issues you might have.